Key Engineering Takeaways
- •Infrared (IR) control is cheap ($1) and simple, but requires line-of-sight and is sensitive to bright ambient sunlight.
- •Bluetooth (HC-05 / ESP32 BLE) provides reliable 10-meter wireless serial communication with any Android or iOS smartphone app.
- •The ESP32 can host its own Wi-Fi Access Point (AP) serving a responsive touch joystick web page to any phone browser without installing an app.
- •The nRF24L01+ 2.4GHz radio module enables custom physical handheld dual-joystick transmitters with ranges from 100m to 1km (with external antenna).
- •Always implement an automated communication watchdog: if no valid wireless packet is received for 500ms, immediately cut motor power to prevent runaway robots.
- • Basic Arduino sketch upload and serial communication knowledge
- • IR Receiver (TSOP4838) + IR Remote
- • HC-05 Bluetooth Module or ESP32 Board
- • nRF24L01+ Transceiver Pair
- • Smartphone or PC
Wireless Protocols Overview & Range Comparison
Selecting the right wireless protocol depends on your control interface, range, and latency needs:
| Protocol | Frequency | Range | Latency | Controller Device | Best Use Case |
|---|---|---|---|---|---|
| Infrared (IR) | 38 kHz Optical | 5 – 8 m (Line of Sight) | 50 – 100 ms | Standard TV remote / Mini IR keypad | Budget indoor starter rovers |
| Bluetooth (HC-05) | 2.4 GHz RF | 10 – 15 m | 20 – 40 ms | Android / PC Bluetooth Terminal | Simple smartphone button drive |
| ESP32 Wi-Fi (Web) | 2.4 GHz Wi-Fi | 30 – 50 m | 10 – 30 ms | Any web browser (iPhone/Android/PC) | Zero-app touch joystick control |
| nRF24L01+ 2.4G | 2.4 GHz GFSK | 100 m – 1000 m | < 5 ms (Real-time) | Custom Arduino handheld transmitter | Fast combat rovers & quadcopters |
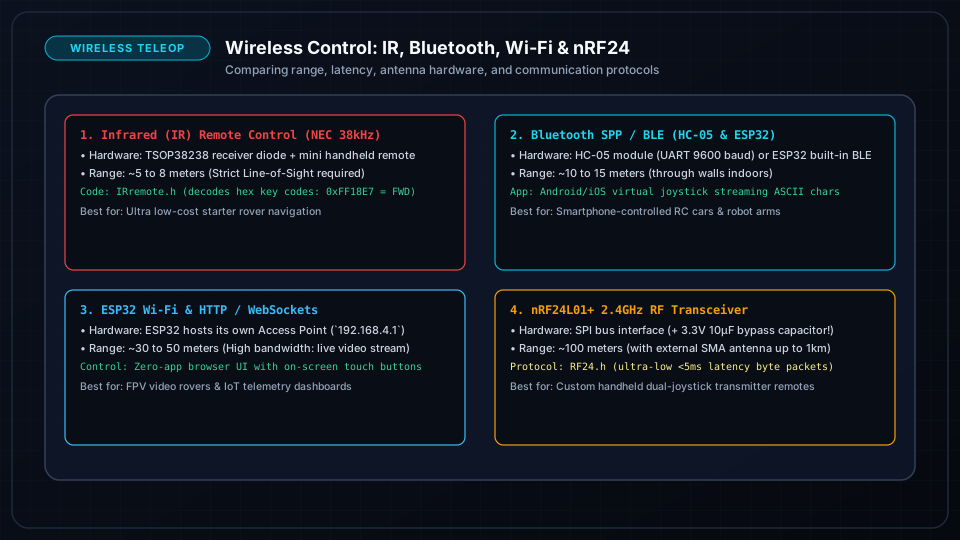
Method 1: 38 kHz Infrared (IR) Remote Control
Using the popular <IRremote.h> library to decode standard NEC protocol remote buttons:
#include <IRremote.hpp>

const int IR_RECEIVE_PIN = 2;

void setup() {
  Serial.begin(115200);
  IrReceiver.begin(IR_RECEIVE_PIN, ENABLE_LED_FEEDBACK);
}

void loop() {
  if (IrReceiver.decode()) {
    uint32_t command = IrReceiver.decodedIRData.decodedRawData;

    switch (command) {
      case 0xE718FF00: // 'UP' Arrow Button Code
        setMotors(200, 200);
        break;
      case 0xAD52FF00: // 'DOWN' Arrow Button Code
        setMotors(-200, -200);
        break;
      case 0xF708FF00: // 'LEFT' Arrow
        setMotors(-150, 150);
        break;
      case 0xA55AFF00: // 'RIGHT' Arrow
        setMotors(150, -150);
        break;
      case 0xE31CFF00: // 'OK' / STOP Button
        setMotors(0, 0);
        break;
    }
    IrReceiver.resume(); // Receive the next value
  }
}
Method 2: Bluetooth Classic & BLE Smartphone Apps
Wiring HC-05 to Arduino:
- HC-05 VCC → Arduino 5V
- HC-05 GND → Arduino GND
- HC-05 TXD → Arduino Pin 2 (SoftwareSerial RX)
- HC-05 RXD → Arduino Pin 3 via Voltage Divider (1kΩ/2kΩ to step 5V down to 3.3V)
#include <SoftwareSerial.h>

SoftwareSerial BTSerial(2, 3); // RX, TX
unsigned long lastPacketTime = 0;

void setup() {
  BTSerial.begin(9600);
  initMotors();
}

void loop() {
  if (BTSerial.available()) {
    char cmd = BTSerial.read();
    lastPacketTime = millis(); // Reset safety watchdog

    if (cmd == 'F') setMotors(200, 200);       // Forward
    else if (cmd == 'B') setMotors(-200, -200); // Back
    else if (cmd == 'L') setMotors(-180, 180);  // Left
    else if (cmd == 'R') setMotors(180, -180);  // Right
    else if (cmd == 'S') setMotors(0, 0);       // Stop
  }

  // Safety Watchdog: Stop if connection lost for > 500ms
  if (millis() - lastPacketTime > 500) {
    setMotors(0, 0);
  }
}
Method 3: ESP32 Built-in Wi-Fi Web Controller
The ESP32 creates its own local Wi-Fi network (RoboRover-AP). Connect your phone to the Wi-Fi and open http://192.168.4.1 in Chrome or Safari:
#include <WiFi.h>
#include <WebServer.h>

WebServer server(80);

const char* htmlPage = R"rawliteral(
<!DOCTYPE html>
<html>
<head><meta name="viewport" content="width=device-width, initial-scale=1">
<style>
  body { text-align:center; font-family:sans-serif; background:#111; color:#fff; }
  .btn { width:90px; height:80px; font-size:24px; margin:8px; border-radius:12px; background:#2563eb; color:#fff; }
</style></head>
<body>
  <h2>ESP32 Robot Rover</h2>
  <button class="btn" onclick="fetch('/cmd?v=F')">▲</button><br>
  <button class="btn" onclick="fetch('/cmd?v=L')">◄</button>
  <button class="btn" onclick="fetch('/cmd?v=S')" style="background:#dc2626;">■</button>
  <button class="btn" onclick="fetch('/cmd?v=R')">►</button><br>
  <button class="btn" onclick="fetch('/cmd?v=B')">▼</button>
</body></html>
)rawliteral";

void handleRoot() { server.send(200, "text/html", htmlPage); }

void handleCommand() {
  String val = server.arg("v");
  if (val == "F") setMotors(220, 220);
  else if (val == "B") setMotors(-220, -220);
  else if (val == "L") setMotors(-180, 180);
  else if (val == "R") setMotors(180, -180);
  else setMotors(0, 0);
  server.send(200, "text/plain", "OK");
}

void setup() {
  WiFi.softAP("RoboRover-AP", "12345678"); // SSID and Password
  server.on("/", handleRoot);
  server.on("/cmd", handleCommand);
  server.begin();
}

void loop() {
  server.handleClient();
}
Method 4: nRF24L01+ 2.4GHz RF Joystick Transceiver
For professional zero-lag custom joystick remotes, the nRF24L01+ transmits structured binary C-struct payloads in under 3 milliseconds:
#include <SPI.h>
#include <RF24.h>

RF24 radio(7, 8); // CE, CSN pins
const byte address[6] = "ROBO1";

struct JoystickData {
  int16_t throttle; // -255 to +255
  int16_t steering; // -255 to +255
  bool buttonBoost;
};

JoystickData receivedData;

void setup() {
  radio.begin();
  radio.openReadingPipe(0, address);
  radio.setPALevel(RF24_PA_MAX);
  radio.startListening();
}

void loop() {
  if (radio.available()) {
    radio.read(&receivedData, sizeof(JoystickData));

    // Differential Steering Mixer Formula:
    int leftSpeed = receivedData.throttle + receivedData.steering;
    int rightSpeed = receivedData.throttle - receivedData.steering;

    setMotors(leftSpeed, rightSpeed);
  }
}
Frequently Asked Questions
Why does my nRF24L01+ module fail to transmit or drop packets constantly?
The nRF24L01+ draws sudden bursts of current during 2.4GHz RF transmissions. If powered from a noisy Arduino 3.3V pin, the voltage dips and corrupts the radio. Solder a 10uF to 100uF electrolytic capacitor directly across the VCC and GND pins of the nRF24 module.
Can I control my robot over the internet when I am away from home?
Yes! By using an ESP32 connected to your home Wi-Fi and using a cloud IoT broker (such as MQTT, Blynk, or WebSockets with ngrok/port forwarding), you can stream sensor telemetry and control your robot from anywhere in the world.